
This article will guide you through some strategies and techniques to improve your mixing skills by using nothing but audio constructions kits and Ableton Live's stock plugins. I’ll be using a construction kit called Global Tech House Vol 1 by Producer Loops. One of the greatest advantages of this type of for learning and honing your mixing skills, is that they come with Ableton Live templates, so if you’re an Ableton Live user, you can skip all the sound design and arrangement work and start mixing right away.
Gain Staging
The first thing we’re going to focus on in a mix is gain staging, which is the process of adjusting and maintaining the overall volume of the mix in a way that optimizes the efficiency of the workflow and the quality of the results by working under safety volume levels, while minimizing noise and distortion. The main goal here is to preserve enough headroom in the master track all throughout the mix to account for the increase in audio levels that the final stages of the mix will yield, as well as avoid gain overload on the audio plugins in order for them to work more transparently and effortlessly. Sufficient headroom on the master track is also necessary to provide some space to work with when the mix is delivered for mastering, so the gain stage of the mix must be tracked from start to finish, and never exceed the -6 to -3 db range.
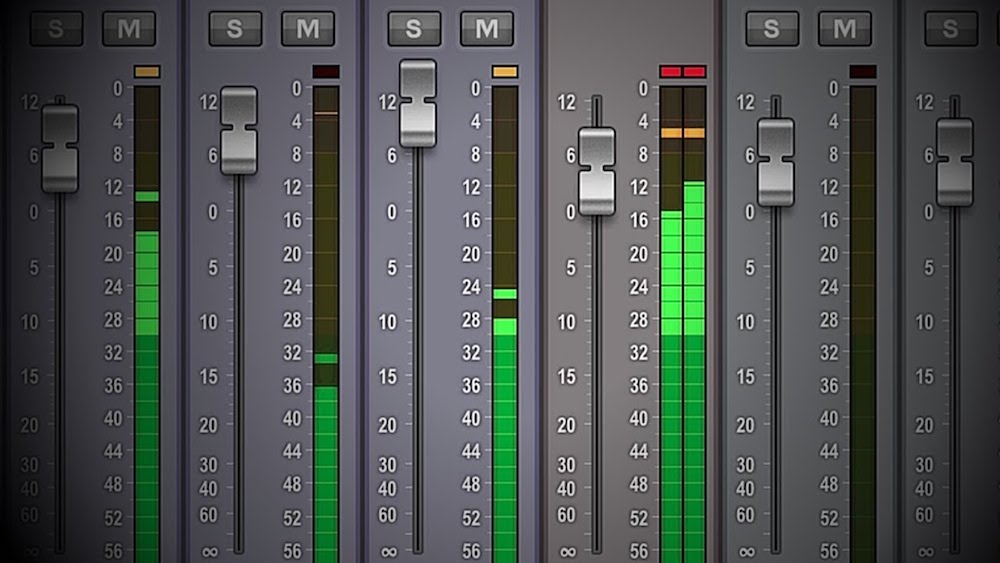
It’s important to know that in order to gain stage properly, the individual levels of each track are the ones that need to be handled, not the master track. The reason for this is that if the master track is clipping and its fader is lowered, the meter warning disappears, because it only warns against audio peaks hitting beyond 0 db, but the clipping of the signal remains, only at a lower volume. For this same reason it’s important to refrain from adding a limiter to the master track when mixing, and leave the master fader at 0 db at all times.
In order to start taking care of the gain staging, we need to set a rough volume balance between all of the tracks. A great way to do this is by converting the mix to mono with Ableton’s Utility mono switch enabled on the master track. This way, we can concentrate on the levels of each track more easily than we’d normally do were they spread all across the stereo field.
Once a rough balance is established, we need to take the peak signal level of the mix in the master track between the -6 to -3 db range by selecting all the tracks with Shift + left click and drag all the volume sliders at once. We need to alternate this last step with the reset of the peak level button of the master track until we get the desired reading.
Subtractive Equalization
For the next stage of our mix we are going to look at subtractive equalization, and how it can be used to add more space, clarity and sharpness to the mix through the removal of unwanted and clashing frequencies. For this, we’re going to insert an EQ Eight on each audio track. We start by rolling off all the frequencies below 20-30 hz as frequencies below this just add clutter and mud to the mix. This frequency range also triggers any compressor placed after it, causing the rest of the frequencies to duck unnecessarily. We can remove this frequency range with a low cut frequency filter set at 20-30 hz on the first band of the Eq Eight on each track.

Moving on to higher frequencies, we can low cut (high pass) on higher frequency sounds to higher than 30 hz, paying attention to the frequency display as well as our ears in order not to cut too much low end. Switching back and forth between listening to each track in solo mode and the full mix is advisable here. On high pitch sounds such as hats and cymbals, we can cut as far up as to around 3-5 khz.
The last step will be to declutter the mid range area of the frequency spectrum with a bell filter set on any band between the 2nd and the 7th of every track, and sweep across the spectrum to listen for improvements in the clarity of the mix, as well as problematic or annoying frequency build ups. This bell filter must be quite narrow and surgical, as well as subtle, in order to avoid taking too much out of the sound, so a q filter value of 2 and -4 db should be a good start.
Compression
The next step we’re going to approach is compression, so we’ll add a Compressor audio effect after the EQ. Compression is essentially a realtime volume control that evens out the volume of the audio. In technical terms, it's the process of reducing the dynamic range of an audio signal by decreasing the contrast between its highest and lowest peaks, so that the perceived loudness of the sound becomes more consistent and easily controlled in the context of a mix. This can be done either by taking its loudest peaks down, also known as downwards compression, or by taking its most quiet ones up, also known as upwards compression or expansion.
The first parameter that needs to be set in the compressor is the threshold, which is the level at which the effect will get triggered. For downward compression, we need to adjust the threshold until it starts to hit the highest peaks of the incoming audio signal and we get to see the gain reduction being applied to it in the gain reduction meter.
The next parameter that we need to adjust is the ratio, which will determine the amount of gain reduction applied to the signal. The ratio must generally be higher (4 dbs and above) on single instruments with a high dynamic range, lower (4 dbs and below) on groups, and even lower (2 dbs and below) on full mixes.
Then we’ll move on to the attack parameter, which we will use to control the compression at the beginning of the sound by setting the amount of time that takes for the compressor to start reducing the gain of the signal once it hits the threshold. This parameter is useful to shape the transients of a sound, allowing us to tame the initial bursts of energy that come through, which makes it very handy when it comes to blending sounds that are stacked or superimposed, and on other situations where transients may overpower the mix. We will generally use long attack times to preserve the transients of the sound, and short attack times to attenuate them.
Since the transients are the loudest parts of a sound, the attack parameter plays a big role at controlling the gain of each track, decreasing it with fast attacks and increasing it with long ones.
The next parameter we have to set is the release time, which we will use to adjust how long the compressor will take to stop reducing the gain of the sound once the signal leaves the threshold. This parameter is used to control the body of the sound, allowing the compression to be sustained all the way through or quickly released to allow the sound to recover its original volume. Generally, we’ll use short release times to make the audio sound bigger and larger, and long release times to make it sound snappier and tighter. It’s also important to set the release time quick enough for the compressor to recover between transients in rhythmical and percussive parts, otherwise the compression will lose its dynamic characteristic and it’ll sound like we just took the volume of the track down permanently. This can be done automatically by turning the auto switch beneath the release control on, but I find that the trick is to manually adjust the release time in a way that the gain reduction fluctuates in total sync with the rhythm of the incoming signal.
The last crucial parameter is the gain control, which is used to compensate or make up for the gain reduction applied by the ratio. This can also be done automatically by turning the Makeup switch on, or manually. We can also leave the Makeup switch turned on and make some manual tweaks if needed. I personally prefer to leave it off and compensate the gain with additive equalization.
Additive Equalization
We’ll finish with a touch of additive equalization, which is the process of boosting some frequencies in order to add some bite to the sounds and make them cut through the mix.
For this, we’re going to insert a second eq after the compressor in our effects chain and set the low and high cut filters like we did in the first one.
There are 5 basic boosts that can be applied across the frequency span of each track; we can try all of them on each track to find the ones that work best.
Starting from the low end, we can raise the low cut filter Q value to boost the frequency that comes immediately after the cut. This boost is quite narrow and sharp, given that it has a fixed q value, and can be used to tighten and add more bite to the low-mid range of the sounds without mudding the mix.
Moving on, we can try a low shelf filter on the second band. With high Q values, this boost can be much broader than the previous one, and hence, more subtle and transparent, but it can also affect larger areas of the sound, and consequently, add more clutter to the mix, so it’s best to avoid extremely high Q values. Use it to add more presence to the mid-low range.
Further up, we can try a bell filter placed on the 3rd band. This type of boost is very versatile, ranging from surgical to extremely broad. Use it with high q values to bring the whole track forward or with low q values to make the sound cut through the mix at a specific frequency spot. After that, we have the high shelf filter and the high cut filter boosts, which function as a mirror of their low end counterparts in the high end of the spectrum.
If a sound is still not clearly audible after applying additive eq to it, we can raise the eq overall gain until it be.
Master track
In the master track we’re going to insert another compressor, and set it to create a smooth final blend between all the elements in the mix. The settings for this compressor will start with a very low ratio of 2 db, then we’ll adjust the threshold until we see a few dbs of compression in the gain reduction meter. We can leave the rest of the parameters untouched.
After that, we can insert a spectrum analyzer to look for unwanted spikes or gaps in the spectrum that we can flatten or fill up by cutting or boosting at the problematic frequencies on the individual tracks of the mix; however, we’ll normally avoid taking this step too far, as we don’t really need a totally flat frequency profile. A certain degree of irregularity is inevitable and even desirable.
Conclusion
As you can see, construction kits are great to improve your mixing skills in a straightforward and fun way without having to worry about all the other preliminary stages of producing a track. They allow you to focus on this crucial aspect of music production so you can use up all the time you need to master it, all the while making the experience highly enjoyable and satisfying, while remaining a great playground for quick experimentation and practice for anytime you wish to try out new mixing approaches and techniques.


Share this